IQFeed is a native Windows application. You must run it to use any features of IQFeed, including the IQFeed API. There is no Linux or Mac version of IQFeed client software, or any immediate plans to create one. It is possible to launch IQFeed client software on other operating systems, by using one of many technologies that support this functionality. If you wish to pursue this path, please consider our recommendations below.
You may use any technology that allows native Windows applications to run in a non-Windows operating system. The most popular is Wine, which is a <a href=”https://en.wikipedia.org/wiki/Compatibility_layer”>compatability layer</a>. Other possibilities include a full Windows OS installation on your non-Windows machine, such as through Boot Camp, or a <a href=”https://en.wikipedia.org/wiki/Hardware_virtualization”>virtualization tool</a>, like Parallels. This is not an exhaustive list: any tool that purports to run Windows applications in a non-Windows operating system may be used.
Among those options, DTN recommends a commercial product called Crossover, for several reasons:
- It offers a fully-functioned free trial, giving you a chance to evaluate its effectiveness for your situation.
- It works well “out of the box” with minimal customization.
- It is inexpensive compared to other options.
- The full purchase price entitles you to Codeweavers support, which will be useful if you run into any problems using IQFeed.
If you run into technical issues using Crossover or any third-party tool, the root of the issue may be beyond DTN’s control. We will analyze any log files or error messages you get, and provide all the information we can, but we can’t do advanced troubleshooting on a third-party application.
Crossover Instructions
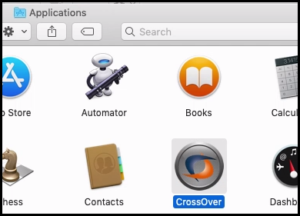
- Launch CrossOver
- Click Install A Windows Application

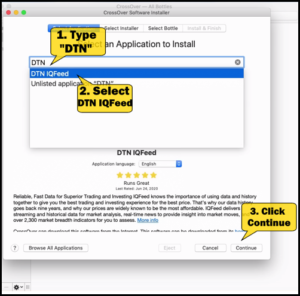
- When asked to Select an Application to install: type DTN
- Select DTN IQFeed
- Click Continue
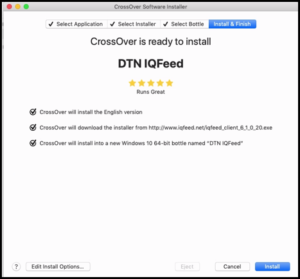
- Review the screen below and make sure it says CrossOver will install in a new Windows 10 64-bit bottle
- Click Install
- The Windows Install process for DTN IQFeed will begin
- Follow the on-screen instructions
To launch DTN IQFeed under CrossOver must follow these steps, in the following order.
- Within CrossOver, select the DTN IQFeed bottle under Bottles
- You many need to click on the three bottles icon at the top left to make the left pane visible
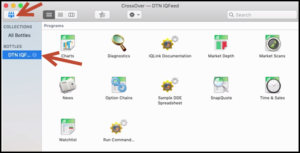
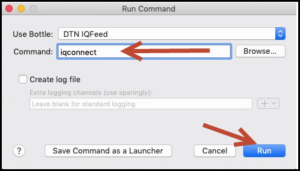
- Double Click Run Command
- In the Command line, type iqconnect
- Click Run
- The IQ Connect login box will come up, but the Connect button will be grayed out
- Open one of the IQFeed applications to make the Connect button active
- Examples: Charts, Market Depth, Market Scan, News, etc.
- Enter your login and password
- Click on Connect
- If you use a 3rd party software, you may now login

Legacy Wine Instructions
This section is for users who may have previously installed IQFeed using Wine, or wish to use “vanilla” Wine instead of using a commercial product like CrossOver.
IQFeed is now a 64-bit application, so your operating system and whatever tool you’re using to run Windows apps will have to fully support 64-bit apps. (This precludes any pre-Catalina version of macOS.)
See https://wiki.winehq.org/FAQ for the current Wine prerequisites.
If you previously installed IQFeed version 6.0.0.5 or earlier, you must uninstall it and reinstall a more recent version of IQFeed for use with Wine. (This is because earlier versions were partially or wholly 32-bit.) We recommend the most current version of the client software available from https://www.iqfeed.net/dev/api.cfm.
We recommend the latest Install For Wine Stable version of Wine, available from https://dl.winehq.org/wine-builds/macosx/download.html.
- Go to The Wine Downloads page on winehq.org for macOS.
- Click Installer For Wine Stable link at the top. This will download a .PKG file to your system.
- Double-click the .PKG file to begin the installation.
- Follow the prompts in the install program. Grant any permission that is requested.
- You may get messages that wine-mono and Gecko packages are missing. Install them.
- Use the “Install For All Users” option, unless you have a specific reason for doing otherwise.
- If you are given options or 32- or 64-bit support, select 64-bit support whenever offered. 32-bit support is not needed, unless you need it for reasons outside of IQFeed.
If you are installing IQFeed under Wine for the first time, follow the steps in this section. If you have a previous IQFeed install using wine, you can try these steps but if you run into errors, see our troubleshooting section below.
- Go to The IQFeed Download page and click Download to download the latest .EXE file.
NOTE: the command in Step 3 assumes you have downloaded this to your Downloads directory for the current user. If this is not the case, you will need to adjust the path in Step 3 accordingly. - You must install IQFeed using the Terminal app in macOS. To do this:
- Launch the Terminal app from the Utilities (Shift + Command + U).
- Type the following text into Terminal:
/Applications/Wine\ Stable.app/Contents/Resources/wine/bin/wine64 downloads/iqfeed_client_6_2_0_25.exe
NOTE: Change 6_2_0_25 to the version number you downloaded. Spacing and capitalization must match exactly as above! There is a space (not an underscore) between Wine\ and Stable.app and also a space between wine64 and downloads.
- The Windows install process will begin. Install IQFeed as a normal Windows install.
Ideally you will not need to launch IQFeed yourself because the software you are using with IQFeed should launch IQFeed for you. However, we understand there will be times that you need to manually launch IQFeed for whatever reason. For this purpose, we have provided a terminal shell script to accomplish this. You can find this shell script in your User directory under the filename iqconnect.sh. You can run this script either from the terminal or from the finder and you will be prompted with the IQFeed login screen to enter your IQFeed authentication credentials. You will then need to launch another app (one of the included IQFeed display apps or a 3rd party app) to provide the application credentials IQFeed needs before you will be able to connect.
- Using Terminal
- Launch the Terminal app from the Utilities (Shift + Command + U).
- Type ./iqconnect.sh and hit enter/return. The IQFeed Login screen will appear. You can enter credentials now but the Connect button will be disabled.
- At this point, you can launch your 3rd party app and skip to the last 2 steps unde Using Finder or you can use one of our display apps by continuing with the next step.
- Locate the IQFeed icon in the status menu and secondary-click (both fingers) on it. A menu will appear.
- Select “Display Apps” from the menu. A sub-menu will appear.
- Select the application you wish to use (SnapQuote is recommended if you are unsure).
- Navigate back to the IQFeed Login window and you should now be able to connect.
- Using Finder
- Open Finder
- Navigate to your Home directory (Shift + Command + H)
- Control-Click iqconnect.sh and choose Open With. If Terminal is in the list, choose it and move on to the next step. Otherwise choose Other…,
- A Finder window will appear. Enable All Applications.
- Navigate to the Utilities and select Terminal.
- The IQFeed Login screen will appear. You can enter credentials now but the Connect button will be disabled.
- At this point, you can launch your 3rd party app and skip to step 7 or you can use one of our display apps by continuing with step 4.
- Locate the IQFeed icon in the status menu and Ctrl-Click on it. A menu will appear.
- Select “Display Apps” from the menu. A sub-menu will appear.
- Select the application you wish to use (SnapQuote is recommended if you are unsure).
- Navigate back to the IQFeed Login window and you should now be able to connect.
NOTE: If you are an API customer writing your own application to interface with IQFeed, please check the IQFeed API documentation page for initializing the feed